What Cause Bending Deformation in Long Shaft Forgings
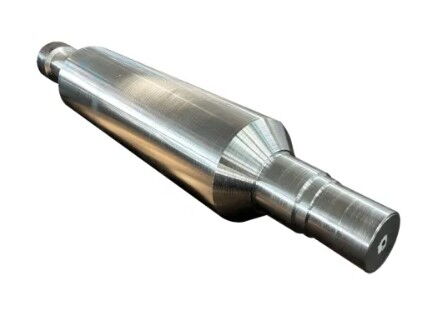
In the field of mechanical processing, the quality of shaft components has always been a key factor in production. This is particularly true for long shaft forgings, which are prone to bending deformation during processing due to their large length-to-diameter ratio. This deformation leads to non-conformance, affecting production efficiency and product quality. This article delves into the causes of bending deformation in long shaft forgings after fine turning and groove cutting, and shares successful experiences in addressing the issue through process optimization and residual stress elimination.
During a recent production run, we encountered a tricky problem. A batch of two shafts showed significant radial runout after fine turning and groove cutting. About one-third of the shafts exceeded the required 0.04mm radial runout, with some reaching as high as 0.20mm. This not only exceeded the allowed tolerances but also severely affected the subsequent processing steps. Although this non-conformance wasn't frequent, when it did occur, it resulted in a large volume of scrap, causing significant disruptions in the workshop.

Shaft components are widely used in mechanical manufacturing, primarily to transmit power and motion. Long shaft forgings, due to their large length-to-diameter ratio, are especially vulnerable to bending deformation during processing. This deformation not only impacts dimensional accuracy but also hinders subsequent processing steps and may even affect the final product's performance and service life.
In this particular production run, we discovered that after fine turning and groove cutting, the radial runout of the outer diameter of some shafts was severely out of tolerance. The specific details are as follows:
Machining Process Requirements: The radial runout of the outer diameter after fine turning and groove cutting should be less than 0.04mm.
Actual Measurement Results: One-third of the batch exceeded the tolerance limit, with some reaching 0.20mm.
Although this issue did not occur frequently, when it did, it caused significant waste and impacted production efficiency and product quality.
To identify the cause of the bending deformation, we conducted a thorough investigation of the entire production process.
First, we focused on the machining process. During rough turning, measurements indicated that the radial runout and axial runout at both ends of the shaft's center holes did not exceed 0.15mm, meeting process requirements. When fine turning and groove cutting were carried out, the cutting parameters were identical to those used previously, during which no large batches of non-conforming parts were detected. Therefore, based on historical production parameters, we concluded that the machining process itself was unlikely to be the cause of the deformation.
Next, we analyzed the raw materials. The material used for the shafts was 8620H, which matched the standard chemical composition and parameters of previous batches, ruling out any raw material issues. The normalizing process, a type of heat treatment, aims to improve the material's machinability and internal structure. While normalizing releases some of the residual stresses within the material, the straightening process afterward could potentially introduce new residual stresses.
Upon deeper investigation, we found that the straightening process was likely the main contributor to the deformation seen in subsequent machining steps. In production, shaft forgings are typically cold straightened by introducing reverse bending plastic deformation to reduce bending. However, this method generates residual stresses within the forging. After straightening, when rough turning, fine turning, and groove cutting are performed, the surface deformation zone is removed, and the residual stress equilibrium is disturbed. As the elastic zone beneath the surface recovers, the residual stresses redistribute, causing the shaft to bend and exceed tolerances. The straightening amount varies by batch, and smaller deformations in the blanks correspond to lower straightening amounts and less residual stress. Moreover, if the straightened blanks are left in storage for a period of time, the residual stresses may be naturally relieved at room temperature, which may explain why large batches of non-conforming shafts were not previously encountered.
To confirm that the residual stresses induced by the straightening process were the primary cause of the deformation, we conducted a stress relief annealing test on a rough-turned shaft. Stress relief annealing involves heating the workpiece below the Ac1 temperature, holding it for a certain period, and then cooling it to room temperature. The results showed that stress relief annealing effectively eliminated the residual stresses and reduced bending deformation. However, this method requires a long process time, and the company's furnace capacity was insufficient to meet production needs.
As an alternative, we turned to isothermal normalizing. This process involves heating the forging to the austenitizing temperature, quickly cooling it to the pearlitic transformation temperature using forced air cooling, and holding it at that temperature. This method not only refines the forging's microstructure but also effectively eliminates residual stresses by promoting recrystallization and stress redistribution.
Stress relief annealing is a widely used heat treatment method aimed at eliminating internal residual stresses by heating and holding the workpiece at a certain temperature. The specific steps are as follows:
- Heating: Heat the workpiece to a temperature below Ac1 (usually 600°C - 700°C).
- Holding: Hold the workpiece at this temperature for 1-2 hours.
- Cooling: Gradually cool the workpiece to room temperature.
While effective, stress relief annealing is time-consuming and requires specialized equipment, making it less economical for mass production.
Isothermal normalizing is an improved normalizing process aimed at obtaining a uniform pearlitic microstructure while eliminating residual stresses through rapid cooling and holding. The specific steps are as follows:
- Heating: Heat the workpiece to the austenitizing temperature (usually 850°C - 900°C).
- Rapid Cooling: Use forced air cooling to quickly cool the workpiece to the pearlitic transformation temperature (usually 600°C - 700°C).
- Holding: Hold the workpiece at this temperature for 1-2 hours.
- Cooling: Gradually cool the workpiece to room temperature.
Isothermal normalizing not only improves the microstructure but also effectively eliminates residual stresses. Additionally, it is quicker and does not require specialized annealing furnaces, making it more suitable for mass production.
Based on the company's production capabilities, we decided to adjust the order of isothermal normalizing and straightening, placing straightening before isothermal normalizing. This adjustment ensures that any residual stresses induced during straightening are eliminated during subsequent isothermal normalizing, thereby ensuring smooth subsequent machining and improving product yield.
The optimized production process is as follows:
- Raw Material Cutting: Cut the raw materials to the required length.
- Rolling: Roll the material to achieve the preliminary size.
- Isothermal Normalizing: Heat the rolled blank to the austenitizing temperature, rapidly cool it to the pearlitic transformation temperature, and hold it at this temperature.
- Straightening: Cold straighten the isothermally normalized blank to achieve the desired straightness.
- Shot Peening: Remove surface oxidation and impurities from the straightened blank.
- Rough Turning: Perform rough turning to achieve rough machining dimensions.
- Fine Turning: Perform fine turning to achieve precise dimensions.
- Groove Cutting: Cut grooves to complete the final machining process.
- Final Heat Treatment: Perform final heat treatment to achieve the required mechanical properties.
The adjustment not only resolved the bending deformation issue but also improved production efficiency and product quality. The specific effects are as follows:
- Elimination of Bending Deformation: By conducting isothermal normalizing immediately after straightening, residual stresses were effectively eliminated, ensuring that subsequent machining proceeded smoothly.
- Increased Production Efficiency: Isothermal normalizing is faster and does not require specialized annealing furnaces, which reduces production time and increases efficiency.
- Improved Product Quality: Isothermal normalizing not only eliminated residual stresses but also improved the microstructure, enhancing the mechanical properties and dimensional accuracy of the product.
After applying the optimized solution, we tracked the subsequent production of the two shafts and other similar long shaft forgings. The results showed that after the isothermal normalizing process was applied post-straightening, no radial runout issues occurred in subsequent machining. This optimization not only solved the current production problem but also provided a new approach for addressing bending deformation in similar components.
In actual production, we conducted detailed tracking and monitoring of the shafts and other similar components processed with the optimized solution. The specific measures were as follows:
- Regular Inspection: Radial runout checks after each process to ensure compliance with specifications.
- Data Recording: Documenting machining parameters and inspection results for future analysis and improvement.
- Feedback Collection: Gathering feedback from frontline workers to quickly identify and resolve potential issues.
After a period of tracking and monitoring, we found that the optimized solution had a significant impact on the production process:
- Elimination of Bending Deformation: No further occurrences of radial runout exceeding tolerances were observed in subsequent production batches of the shafts or other similar long shaft forgings. The bending deformation issue was completely resolved.
- Increased Production Efficiency: The use of isothermal normalizing reduced processing time, while the elimination of the need for specialized annealing furnaces made the process more efficient and cost-effective, leading to shorter production cycles.
- Enhanced Product Quality: The application of isothermal normalizing not only removed residual stresses but also improved the material's microstructure. As a result, the mechanical properties and dimensional accuracy of the product were significantly enhanced.
This article provides a detailed analysis of the bending deformation problem that occurred in long shaft forgings after fine turning and groove cutting. Through process optimization and the elimination of residual stresses, we successfully addressed the issue. The main actions taken include:
- Process Investigation: A thorough review of machining, raw material, and straightening processes identified that residual stresses from the straightening process were the primary cause of deformation.
- Solution Exploration: Stress relief annealing and isothermal normalizing were tested, with isothermal normalizing proving to be the most effective solution for eliminating residual stresses.
- Process Optimization: By adjusting the order of the isothermal normalizing and straightening processes, we effectively removed residual stresses and improved the yield and quality of the machining process.
- Practical Application and Effect Tracking: After implementing the optimized solution, we observed a significant reduction in defects and improvements in both production efficiency and product quality.
By applying this optimization strategy, we not only solved the current bending deformation issue but also established a new approach for addressing similar problems in the future, paving the way for higher-quality and more efficient production of long shaft forgings.
For those in the shaft forging industry or mechanical processing, this method can provide a valuable reference for improving process reliability, product consistency, and production efficiency. Should you have further questions regarding shaft forging or wish to discuss other aspects of mechanical processing, feel free to reach out for further exploration and discussion.


